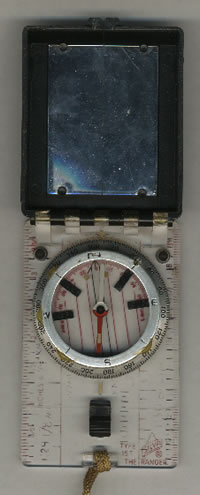
A high-quality orienteering-style compass
is essential for precise triangulation, shooting long-distance
field azimuths, and using as a map protractor & straight
edge for calculating route azimuths and distances.
An ideal one is the Brunton Nexus 54LU
Combi (also sold as the Silva 54 Combi) protractor-style compass
with a unique prism optical sighting mechanism from Kooter's
Geology Tools http://www.egeology.com/54lu.html
(http://www.egeology.com)1-888-383-5219,
$55 including shipping. (Note: This unique, precision compass
is extremely hard to find, but it is worth every penny
if you can get your grubby hands on one. It is much faster
and easier to use than baseplate compasses with mirrors. It
is functionally accurate to 0.5 degrees. If you have trouble
locating it, try http://www.gps4fun.com,
http://www.1sks.com, or
search for it using the Froogle Google search engine at http://www.froogle.com).
These simple, abacus-like units are extremely
handy for complicated, multi-leg routes that require continuous
pacing or dead reckoning.
You can make your own or buy a set from
Brigade Quartermasters, item no. SPC99 or RPC295 (avoid commonly
available ceramic ones--they crack easily), 1-800-338-4327,
http://www.actiongear.com.
A roamer scale is essential for plotting
UTM coordinates on topographic maps.
You can make your own or, if you're a regular
on Sierra Club trips, request a free one from Michael Neiger.
(Note: Most of the commercially-made units are too big for
field use.)
For Michigan wilderness trips, you'll need
roamer plotters for both 1:24000 and 1:25000 topographic maps.
For Canadian wilderness trips, you'll need roamer plotters
for both 1:20000 and 1:50000 topographic maps.
A 0.5mm mechanical pencil (consistent width
makes it more accurate than a regular pencil) with an eraser,
and wrapped with a rubber band to create friction and prevent
loss, is essential for annotating maps, plotting azimuths,
and recording GPS data such as plots, times, azimuths, landmarks,
distances, and pacing info on notepaper.
A waterproof pen may be needed to mark
on waterproofed maps. The Fisher Space Pen is a proven foul-weather
writing instrument and is available from Campmor, no. 31655,
1-800-226-7667, http://www.campmor.com,
or Forestry Suppliers, no. 49237, 1-800-647-5368, http://www.forestry-suppliers.com.
Waterproof notepaper is essential for recording
GPS plot/time/azimuth/landmark/distance/pace info when cutting
complicated, multi-leg routes.
You could buy a small, pocket-size, waterproof
notepad from Campmor, no. 31653, 1-800-226-7667, http://www.campmor.com,
or Forestry Suppliers (lots of paper choices), 1-800-647-5368,
http://www.forestry-suppliers.com.
You could also make your own by simply
waterproofing 3-by-5 cards or pieces of heavy-duty paper,
just as you did your topo maps.
A 12-inch-long piece of white, waxy (sticky)
dental floss marked at one-klick (1000 meter) intervals (per
map scale) is handy for rapidly measuring irregular routes
on a quad in the field.
To carry dental floss, tie it to the above
pencil, wind the remainder around the pencil, and secure the
loose end under the rubber band.
Maps, notepaper,
and journals must be properly waterproofed and encased to
withstand the abuse of a long-range wilderness trip.
Moisture will turn unwaterproofed maps
and other paper products into soggy, papier-mache-like messes
in short order. Likewise, maps not protected by a map case
will be torn to shreds by brush, rough handling, and repeated
folding.
The best way to waterproof and reinforce
topographic maps is to use a commercial map sealer such as
Map Seal, Map Proof, Map Life, or Stormproof.
Aqua Seal
Trondak, Inc. (manufacturer)
1-425-290-7530
http://www.aquaseal.com/
Map Seal is available in 4-, 8-, 16-, and
32-ounce quantities.
Recreational Equipment Inc. (REI) (vendor)
1-800-426-4840
http://www.rei.com/
Campmor (vendor)
1-800-525-4784
http://www.campmor.com
Nikwax (manufacturer)
1-425-303-1410
http://www.nikwax.com/
Summit Hut (vendor)
1-800-499-8696
http://www.summithut.com/
Mountain Gear (vendor)
1-800-829-2009
http://www.mgear.com
Altrec.com (vendor)
1-800-369-3949
http://www.altrec.com/
Safety Central (vendor)
1-650-965-3509
http://www.safetycentral.com
Liberty Mountain (vendor)
1-800-366-2666
http://www.libertymountain.com
Martenson Co. (manufacturer)
P.O. Box 261
Williamsburg, Virginia 23185
While acrylic products such as Minwax's
"Polycrylic Protective Finish" Clear Satin and Krylon's
"Crystal Clear" acrylic spray paint are effective
at protecting maps from the elements, they should be avoided
since they dry so hard the treated surface of the map actually
cracks wherever it is folded.
Masonry and wood sealants, in particular
Thompson's Water Seal, have been widely used to weatherproof
maps. While admittedly not as water repellent, strong, or
durable as some commercial map treatments, Thompson's Water
Seal is effective on quality paper, especially when combined
with a map case such as a zip-lock.
Thompson's Water Seal
Thompson's Company (manufacturer)
1-800-367-6297
http://www.thompsonsonline.com
Note: using Thompson's Water Seal Clear
Multi-Surface Waterproofer on maps
is a nonstandard application of this product.
Source: Thompson's Water Seal is sold by
the gallon
at hardware and building supply stores.
Always apply a map sealant according to
the manufacture's directions. If none are provided, apply
the sealer to both sides with a paintbrush, sponge, rag, or
paper towel until the map is damp.
Next, wipe off any excess sealant from
both sides with a paper towel to prevent the map from becoming
sticky or gummy upon drying.
To dry a treated map, suspend it from
a thin rope with clothespins. If necessary, apply a second
coat. Always waterproof both primary and backup maps. An iron
can sometimes be used to remove wrinkles.
For heavy-duty use, cover the backside
of waterproofed maps with clear contact paper or transparent
shelf paper as it will extend their life substantially.
However, keep the working side--the front--unlaminated
so that annotations can be added and azimuths plotted. Wal-Mart
and K-Mart are good sources for rolls of clear contact paper.
Air bubbles trapped under contact paper can sometimes be "worked
out" by burnishing or rubbing the surface.
In the bush, a waterproofed map should
be folded in quarters and carried in one- or two-gallon-size,
freezer-grade, zip-lock plastic bags. The edges of a zip-lock
bag can be easily reinforced by folding wide, clear, shipping
or packaging tape over each edge.
Zip-locks protect maps from wear and tear
while at the same time keeping them clearly visible for in-the-field
map reading. In addition, the air trapped in a zip-lock will
help the map float if it ends up in a waterway.
Avoid using zip-locks with logos or write-on
strips as they limit viewing of maps. Zip-locks free of imprinting
allow a map to be viewed through both sides of the zip-lock.
While under way in the bush, a waterproofed,
zip-locked map should be carried in a manner so it is always
oriented towards north, or the terrain at hand.
Folded in quarters, with the area of travel
visible, the zip-lock can be held between the thumb and forefingers,
with the thumbnail marking your current position on the map.
This technique is known as "thumbing."
If both hands need to be free for climbing
or another activity, simply secure the zip-lock, folded in
quarters, to one of your forearms with a couple of rubber
bands for quick, on-the-go use. Two, doubled-over, seven-inch-long,
no. 117 size rubber bands work very well.
To accurately calculate
route azimuths as well as rapidly plot GPS coordinates in
the bush, it's essential that topographic maps are overlaid
with the 1,000-meter Universal Transverse Mercator (UTM) grid.
While many maps come with the UTM grid
pre-plotted, many do not. Take the time to make sure your
maps have these black easting (vertical) and northing (horizontal)
grid lines, both of which are spaced exactly 1,000 meters
apart. Don't confuse this grid system with the red horizontal
and vertical section lines, which are spaced about 1 mile
apart.
If your maps are not overlaid with the
UTM grid lines, draw them on by connecting the short, light-blue
tick marks along all four map margins. Do not confuse the
blue UTM grid tick marks with the black 10,000-foot State
Plane Coordinate (SPC) grid tick marks or the black latitude
and longitude tick marks.
Your UTM grid lines must be exactly 1,000
meters apart. Double-check the accuracy and interval spacing
of your hand-drawn grid lines using the map scale in map margin.
Draw each line using a .5mm mechanical
pencil (reduces error created as regular pencils dull and
lay down wider lines) and a straightedge, such as a new, absolutely
straight (sight down it), nick-free (run your finger nail
along edge) aluminum yardstick available from a building supply
store.
In the field, you will use the easting
(vertical) UTM grid lines for calculating exact azimuths for
challenging navigational situations requiring a high degree
of accuracy. We will not be using the meridians of longitude
or the south-to-north red section lines for calculating technical
azimuths when we need dead-on accuracy.
The magnetic declination figures we use
will be updated for the current year and adjusted for use
with the easting (vertical) UTM grid lines, not the meridians
of longitude or section lines.
While meridian of longitude lines, if pre-plotted,
are fine for azimuth calculating, they do not lend themselves
to rapid, on-the-go plotting in the bush. The red, south-to-north
section lines are not suitable for technical azimuth plotting
since they are neither consistently straight nor predictable
in orientation, even on the same quad.
Always make sure your GPS unit is properly
configured for the type of navigating you will be doing or
it will spit out inaccurate positional fixes.
Select the 1000-meter Universal Transverse
Mercator (UTM) grid coordinate system as it is much easier
to use for quick, on-the-go land navigation that involves
integrating traditional route-finding tools such as topographic
maps, compasses, and ranger pacing beads. Do not select latitude-longitude,
MGRS, etc.
Check the margin of your map for the appropriate
horizontal datum (do not use the vertical datum).
Currently, most Michigan topographic maps
use the 1927 North American Datum (NAD 27). Some GPS units
may break the North American Datum down further with CONUS
(CONtinetal US), Canada, etc. Future topographic maps may
well use the NAD-83 or WGS-84 datums, which are identical
to each other for our purposes.
Canadian topographical maps for Ontario
generally use either NAD 27 (Canada) or NAD 83. Newer maps
may appear with the WGS-84 datum.
There are over a hundred (100) map datums,
so get it right. If you select the wrong one, your GPS unit
will be outputting incorrect coordinates. Do not select WGS
84 (usually the default setting), Mexico, Timbuktu, etc.,
as these will result in incorrect readings. For example, the
difference between the WGS-84 and NAD-27 datums is about 300
meters.
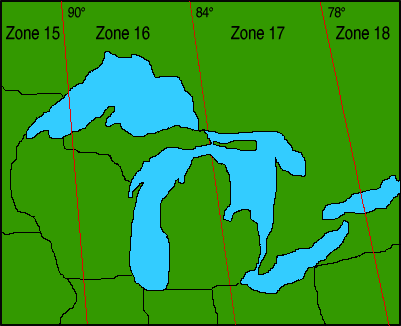
The UTM grid system splits the world up
into 60, longitudinally-arranged zones. Each zone is six (6)
degrees of longitude in width, from east to west. Check the
margin of your map for the correct UTM zone number.
Michigan is covered by two zones: 16 and
17. The 84 degrees west meridian of longitude represents the
dividing line between zone 16 and zone 17. This meridian of
longitude lies along an imaginary, north-to-south line running
through Michigan communities such as Adrian, Saginaw, Standish,
Atlanta, and De Tour Village, near Drummond Island.
The meridian
of longitude
at 84 degrees
west represents
the edge of
UTM zone 16
and zone 17,
both of which
cover the state
of Michigan.
(Drawing by
Michael A. Neiger)
Zone 16 lies west of this meridian of longitude.
Zone 17 lies to the east of this meridian of longitude. In
other words, zone 16 covers the western three-quarters of
the Upper Peninsula as well as the western two-thirds of the
Lower Peninsula. Correspondingly, zone 17 covers the extreme
eastern end of the Upper Peninsula as well as the eastern
third of the Lower Peninsula.
Most GPS units have three units of measure:
statute (tradition English mile measure; usually the default),
nautical (the nautical mile is slightly longer than the statute
mile), and metric (meters). Select the metric setting for
the UTM coordinate system. The statute and nautical units
of measure will both produce inaccurate readings when used
with the UTM grid coordinate system.
If your unit requires it, select the appropriate
hemisphere, which for Michigan and Canada will be the northern
hemisphere. You may not have to specify this.
Once you arrive at the starting point for
your wilderness trip, always proof-check your GPS unit at
a known location on the ground (e.g.: bridge, intersection,
confluence of two rivers, lake) and compare this positional
reading with the same known location on the topographic map.
If you get in the habit of always doing this, you will be
able to catch any erroneous configuration before it is too
late, deep in the bush.
Pace counting, or tally stepping as it
is sometimes called, is an ancient technique. Legionnaires
in the Roman Army used it on the battlefield just as today's
elite warriors do. Ranger pacing beads were widely used in
Vietnam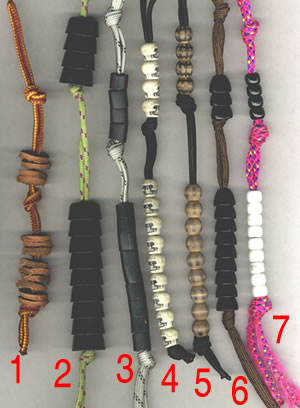 and continue to be popular with Army Rangers, Army Special
Forces units such as the Green Berets and Delta Force, Navy
Seals, and the British Army's SAS (Special Air Service).
and continue to be popular with Army Rangers, Army Special
Forces units such as the Green Berets and Delta Force, Navy
Seals, and the British Army's SAS (Special Air Service).
The photograph on the right depicts several
different types of commercial and handmade pace counting beads.
- Homemade beads made from leather disks,
similar to hard, rubber disks used by Canadian forces, sold
by Canadian Peacekeeper. Note: Disk-type pace counting beads
are difficult to use in the dark or with gloves since you
can't easily differentiate between them by feel.
- Beads made from indestructible rubber-like
cups, used by Army Rangers, sold by Brigade Quartermasters.
Very popular.
- Homemade beads made from short sections
of rubber tubing.
- Unique beads made from miniature skulls,
used by Airborne Infantry, sold by U.S. Cavalry and Brigade
Quartermasters. Very popular.
- Homemade beads made from drilled-out,
wooden, craft-shop beads.
- Hard, ceramic beads, which crack much
too easily, widely available at military supply outlets.
- Homemade beads made from craft-shop
beads, which crack much too easily.
Our English statute mile is based on the
Roman soldier's mile. The Latin phrases "mille passus,"
or "milia passuum," which meant a "thousand
paces," were eventually shortened to a "mile"
in English. The average soldier laid down 5,000 "foot-lengths"
or "feet" in a mile. Much like the pace we use today,
a Roman pace consisted of two steps equalling about 5 "foot-lengths."
While pace counting is admittedly an arcane
distance determination technique that is seldom used by trail-bound
hikers, it is an essential technique used by advanced-level
land navigators who travel cross-country through challenging
wilderness. In certain situations, a map and compass alone
just aren't enough.
In his book, entitled "Orienteering,"
John Disley aptly writes that "more mistakes are made
in orienteering by wrongly estimating distance than from any
other reason." While most of us can quickly learn to
travel in the right direction, few of us have any idea of
how far we have traveled.
Think about Disley's observation for a
moment. Have you ever cut an azimuth through the bush and
wondered if you had missed your target, or perhaps not gone
far enough, when it did not materialize? Did you continue
on another 10 minutes, then 20 minutes, hoping it would appear?
Or did you backtrack? You could have eliminated much of the
guesswork in this situation by using a technique known as
"step-counting."
Pace counting with Ranger pacing beads
is well suited for the complicated navigational challenges
faced by today's wilderness navigator. For example, pace counting
is essential for dead reckoning, where azimuth (or direction
of travel) data is combined with pacing (or distance traveled)
data. With this technique, one can establish his or her position
in nondescript terrain, foul weather, or even in complete
darkness. The "dead" in dead reckoning is derived
from "ded.," an abbreviation of "deduced."
It's navigation by logical deduction. It does not necessarily
mean it's a deadly form of navigation.
Commercially manufactured pace counting
beads are hard to find. However, several military supply outlets
currently sell pacing beads configured for the metric measurement
system, which dovetails nicely with 1000-meter UTM grid system
used on CUPG wilderness trips lead by Michael Neiger.
1-800-561-3040
http://www.canadianpeacekeeper.com
Item no. 1020, uses unbreakable rubber disks,
which may be difficult to use at night or while wearing gloves.
http://www.georgia-outfitters.com
Item no. 4594. fragile ceramic-type beads.
http://hsgear.safeshopper.com/25/cat25.htm?91
Fragile ceramic beads.
http://www.majorsurplusnsurvival.com
Select "other miscellaneous."
Fragile ceramic beads.
1-888-922-1493
http://www.omahas.com
Select "belts." Fragile ceramic
beads.
http://www.nucleus.com/~kitshop/netcat.htm
Item no. 4569.
1-800-247-4541
http://www.rangerjoe.com
Item no. 0122, Fragile ceramic beads.
http://www.specwargear.com/
Select "gear" and "survival
gear." Fragile ceramic beads.
1-888-888-7228
http://www.uscav.com
Item no. 18802, unique skull-type beads.
To construct your own metric-measurement-based
pacing beads, you'll need 13 3/8-inch-diameter wooden beads,
which you can buy at a craft shop, and a 33-inch-long black
nylon bootlace from K-Mart or Wal-Mart. Avoid using brittle
plastic or ceramic beads as they will shatter when they bang
up against a rock.
Drill a hole, most likely about 3/16-of-an-inch
in diameter, through each bead. The hole should be sized so
the bead fits snugly on a doubled-over section of the bootlace.
It's important that the bead not slide by itself on the bootlace;
you should have to pull it along with your fingers.
After folding the lace in half, thread
on the beads, four in the top 1000-meter-klick group (nearest
the closed end of the bootlace) and nine in the bottom 100-meter-march
group. Use an overhand knot at each end to prevent the beads
from coming off.
Tie another overhand note in between the
two groups of beads to keep them separated. If you leave a
large loop at the looped end, above the overhand knot located
over the four klick beads, you'll be able to use it for attaching
the pacing unit to your pack strap or a D-ring.
Configured for the metric measurement system,
which is how it should be for a CUPG wilderness trip lead
by Michael Neiger, you'll be able to keep track of up to five
klicks of travel. Metric-based pacing beads are ideally suited
for use with the UTM grid system and a GPS unit similarly
configured. Your finished pacing bead apparatus should be
arranged as follows:
- Upper klick (kilometer) counter: four
1000-meter (one klick or kilometer) beads
- Lower march counter: nine 100-meter
(1/10 kilometer) march beads
To reconfigure a set of metric pacing beads
for use with the English measurement system, or the statute
mile, simply move two of what were the lower 100-meter march
beads to the upper group of what were the one-klick or 1000-meter
beads. The seven lower beads become 110-yard or 1/16-mile
march beads and the six upper beads become 880-yard or half-mile
beads.
Configured for the English measurement
system, which is not used on CUPG wilderness trips lead by
Michael Neiger, your finished pacing bead apparatus should
be arranged as follows:
- Upper half-mile counter: six 880-yard
(or 1/2 mile) beads
- Lower march counter: seven 110-yard
(or 1/16 mile) beads
A field-expedient pace counting system
can be improvised by simply gathering up several small pebbles
or acorns and then moving them from one pocket to another
every 100 meters. Pebbles have long been used for reckoning.
The English term "calculate" is derived from the
Latin word "calculus," a term that refers to a small
stone or pebble used for doing arithmetic or reckoning.
Another way of keeping track of your pacing
is to make a small slash mark on a piece of paper as you complete
each 100-meter march. Or, you could tie a knot in a spare
bootlace or short piece of cordage.
For the purposes of pace counting, a pace
is defined the distance between two foot-strikes of the right
foot. In other words, a pace is counted each time the right
foot strikes the ground, not each time the right and the left
foot strikes the ground.
To use pacing beads configured for the
metric measurement system, the average adult male traveling
on a flat, open trail can simply count the number of times
his right foot hits the ground and pull a lower 100-meter
march bead every 66 paces, which should equal 100 meters,
assuming his pace is about 1.5 meters long. The number of
paces necessary to cover 100 meters for other pace lengths
can be determined by referring to the chart below.
When no lower 100-meter march beads remain
to be pulled, simply pull down an upper klick bead, which
represents 1000 meters of travel, and then reset the 100-meter
march beads by sliding all 9 back up.
Using pacing beads configured for the English
measurement system is equally simple. The only difference
is that when you reach to pull down the eighth march bead,
which does not exist, simply pull an upper half-mile bead,
resetting the lower march beads to begin counting into the
next half-mile segment. This setup will allow you to keep
track of up to 3.5 miles worth of pacing.
If you find you must make a lateral move
to avoid an natural barrier or obstruction--be it a swamp,
cliff, or 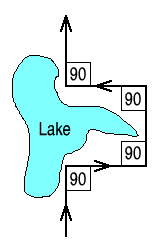 lake--always
stop your forward pace counting and side step to one side
at a right angle to your original azimuth. When you've laterally
cleared the obstacle, continue counting paces as you walk
parallel to your original azimuth route. Once you're beyond
the obstacle, remember to stop counting paces and side step,
at a right angle, an equal number of paces back to your original
line of travel. Begin counting paces again when you resume
travel on your original azimuth. lake--always
stop your forward pace counting and side step to one side
at a right angle to your original azimuth. When you've laterally
cleared the obstacle, continue counting paces as you walk
parallel to your original azimuth route. Once you're beyond
the obstacle, remember to stop counting paces and side step,
at a right angle, an equal number of paces back to your original
line of travel. Begin counting paces again when you resume
travel on your original azimuth.
If a geographical barrier or obstruction
blocks your route, simply move at
right angles to your original azimuth.
(Drawing by Michael Neiger)
Avoid walking directly behind or abreast
of another hiker as their pace may influence your rhythm and
throw off the accuracy of your pacing. Each time you come
upon a known landmark, which you can confirm on your map,
re-start your pacing counting to ensure maximum accuracy.
When traversing known distances, take advantage of the opportunity
to check the accuracy of your pace counting as well as your
rate of travel (minutes per klick).
With practice, pace counting will become
nothing more than a subconscious, background activity that
will greatly increase your land navigation abilities.
One of the easiest ways to calculate your
pace in the field is to simply mark the location where your
right toe (or heel) strikes the ground several times in a
row and then measure the distance between the strike marks
to come up with a good average. If you've measured your boot
length prior to the trip, you can use your boot in a heel-to-toe
fashion to determine your pace length. Always calculate your
pace with a loaded rucksack in the bush you are about to traverse.
Once you know how long your pace is, consult
the table below to determine how many paces to count before
pulling a 100-meter (or 110-yard) march bead. While the march-bead
pace figures in the table below are in meters, they'll work
equally well with the English measurement system since 100
meters equals 110 yards.
|
|
| 6' 0" |
55 |
| 5' 8" |
58 |
| 5' 4" |
62 |
| 5' 0" |
66 (average male) |
| 4' 8" |
71 |
| 4' 4" |
76 |
| 4' 0" |
83 |
| 3' 8" |
90 |
| 3' 4" |
99 |
Always verify your pace length at the start
of a trip as well as whenever the terrain, rucksack load,
or another factor affecting your pace length changes. Once
fully mastered, allow for at least a 10 percent error rate
on flat open terrain.
Hilly terrain will require you to alter
your pace counting some, possibly skipping the counting of
every third pace. You could also recalculate the horizontal
distance advanced for each pace and then use a higher pace
count for each 100-meter up- or down-hill march.
Keep in mind that distances measured on
a two-dimensional map account for horizontal change only--they
assume the terrain is flat. On the other hand, your in-the-field
pacing measurements over the same terrain may be longer if
the area is hilly since your pacing will take into account
both vertical and horizontal influences.
There are several factors that can influence
the length of your pace and ultimately the accuracy of your
results. Make sure you monitor your pace length as conditions
change. Adjust your pace calculations accordingly.
- Gradient: walking up or down grades
will shorten pace.
- Vegetation: weeds, brush, and downed
trees will shorten pace.
- Surface: loose sand, gravel, mud, standing
water, boulders, snow, and ice will shorten pace.
- Weather: high winds will shorten pace.
- Fatigue: as fatigue sets in, your pace
will shorten.
- Load: a heavily-loaded rucksack will
shorten pace.
- Clothing: heavy clothing, bulky boots,
or snowshoes slow pace.
- Contouring (or traversing): walking
sideways on a steep incline will shorten pace.
- Sight distance: darkness, snowfall,
heavy rain, and fog will shorten pace.
On waterproof paper, keep a running log
for each leg of your route. It should include: UTM coordinates,
elapsed time, distance paced, directional azimuth, and landmarks
passed, with the time and paced distance noted. These bits
of info will allow you to hone your distance-measuring skills--both
pace-based and elapsed-time-based--as well as approximate
where you are if you get disoriented.
While not as accurate as pacing, estimating
distance traveled by the passage of time is a very useful
technique. The best way to establish your rate of travel is
to keep track of how long it takes to progress a certain known
distance as determined by pace counting during your hike.
This will ensure that your rate of travel is relative to the
terrain and load at hand. With this information, you can calculate
how long it takes to traverse a klick (1000 meters) as well
as a 100-meter march.
In his book, "The Essential Navigator:
How to Find Your Way in the Outdoors," David Seidman
writes that pedometers are useless on all but firm, level
ground. The gadgets are just not suitable for clambering over
deadfalls or traversing rugged topography.
Aiming off is one
of the most useful land navigation techniques available to
wilderness travelers. It is used when you're headed for a
distant objective, a waterfall for example, which is located
near a linear or elongated feature, in this case a twisty
river. 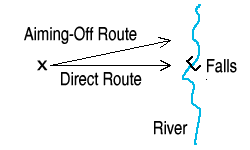
Experienced land navigators aim off to
one side or the other of an objective located on a linear
feature. By doing this, they know which way to search for
the objective once they arrive at the linear feature and
don't see the objective.
(Drawing by Michael Neiger)
For example, if you attempted the direct
route in the illustration and arrived at the river, but did
not see or hear the waterfall, which way would you search
for it? And, how long would you look for it in one direction
before self-doubt would drive you to look in the other direction?
To get around this problem, experienced
land navigators simply "aim off" to one side of
the waterfall. They don't try to hit it dead-on.
Aiming off involves the intentional addition
or subtraction of several degrees of offset--or purposeful
error--to an azimuth so your line of travel to an objective
located on a linear feature takes you to the left or right
of it, eliminating any question of which way you need to search
for it if you don't immediately see it.
Aiming off has also been referred to as
offset, lateral offset, deliberate offset, intentional offset,
and intentional deviation.
Aiming off is necessary since it is nearly
impossible to cut an azimuth without any lateral drift. For
example, errors in cartography (map making), map interpretation,
compass design, compass sighting, and azimuth cutting may
make it difficult to accurately navigate directly to a distant
objective that is not readily visible.
In addition, external magnetic forces created
by wrist compasses, wire rim glasses, watches, belt buckles,
knifes, weapons, ammunition, jewelry, vehicles, fences, and
power lines can influence the accuracy of a magnetic compass,
sometimes in a very subtle, imperceptible manner. Watch out
for this.
The longer the distance traveled or the
more difficult the terrain, the more these factors creep in
to reduce the accuracy of azimuth cutting.
According to the experts, you should expect
about three to five degrees of error--or lateral drift--when
cutting an azimuth with a conventional compass. For example:
- In "The Essential Wilderness Navigator,"
David Seidman says that the average error in cutting an
azimuth through the bush is around 3 degrees.
- W.S. Kals writes in the "Land Navigation
Handbook" that operator error and compass error across
open terrain generally amounts to about 3 or 4 degrees.
- According to Rick Curtis, author of
"The Backpacker's Field Manual," and director
of Princeton University's Outdoor Action Program, 3 to 5
degrees of lateral error is the norm.
- In the second edition of "Maps
and Compasses," Percy Blandford says that 5 degrees
of error in cutting an azimuth is common.
- In "Finding Your Way in the Outdoors,"
Robert Mooers, Jr., says to expect about 3 degrees of lateral
drift.
Aiming off is useful for reaching small,
limited visibility objectives that happen to be located on
or near elongated, long-sided, or linear features.
Examples of linear or "catching"
features that work well for locating hard-to-find objectives
such as campsites, waterfalls, cabins, caves, ponds, trail
intersections, waterway confluences, and so forth include:
- jeep trails
- foot trails
- railroad grades
- creeks and rivers
- valleys
- shorelines
- utility lines
- fence lines
- edges of swamps
- ditches
- tree lines
- ridgelines
- cliffs and escarpments
- firebreaks
- property lines
When calculating how much offset to introduce,
keep in mind that each degree of offset will shift an azimuth
roughly 1/60--or 0.01745 for the more precise--of the distance
traveled.
If you're using the metric measurement
system, such as the kilometer, each degree of deliberate offset
will shift an azimuth 17.45 meters to one side of an objective
for every klick (1,000 meters) of travel.
Use the aiming off table below to calculate:
- How many meters of lateral offset
on the ground will result from each degree of compass offset.
- How many degrees of compass offset
you'll need to use to achieve a set number of meters of
lateral offset on the ground.
| 1 |
17 |
35 |
52 |
70 |
87 |
| 2 |
35 |
70 |
105 |
140 |
175 |
| 3 |
52 |
105 |
157 |
209 |
262 |
| 4 |
70 |
140 |
209 |
280 |
350 |
| 5 |
87 |
175 |
262 |
349 |
436 |
| 6 |
105 |
209 |
314 |
419 |
524 |
| 7 |
122 |
244 |
366 |
489 |
611 |
| 8 |
140 |
280 |
419 |
558 |
698 |
| 9 |
157 |
314 |
471 |
628 |
785 |
| 10 |
175 |
350 |
524 |
698 |
873 |
For those preferring to use the English
measurement system, such as the statute mile, each degree
of deliberate offset will shift an azimuth about 92.14 feet
to one side of an objective for every mile (5280 feet) of
travel.
For those into trig--the problem-solving
method developed long ago by the Egyptians, Babylonians, and
Greeks--the authors of several leading land navigation textbooks
recommend that you take the tangent of 1 degree and multiply
it by the distance traveled to determine how much offset will
result from each degree of change.
This recommendation notwithstanding, a
closer look at the geometric problem involved in aiming off
seems to indicate the tangent solution is more appropriate
for right-angle-type problems, not the oblique-type triangle
problem aiming off involves.
Since aiming off involves an isosceles
triangle--a non-right-angle triangle with two equal-length
sides--the more appropriate trigonometric function may be
the sine. To use the sine function to determine how much offset
will result from the addition of one degree, you would multiply
the distance traveled by the sine of one degree divided by
the sine of 89.5 degrees.
The experts recommend that you use an offset
of somewhere between 2 and 11 degrees. For example:
- In "The Essential Wilderness Navigator,"
David Seidman recommends that you aim off by 5 degrees.
- In its "Map Reading" field
manual, the U.S. Army uses 10 degrees of deliberate offset
in their example.
- In his book, "The Green Beret's
Compass Course," retired Special Forces Sgt. Don Paul
recommends that you use 2 or 3 degrees of lateral offset.
- In "The Outward Bound Map and
Compass Handbook," Gleen Randal says to change your
azimuth by 10 degrees.
- In the "Land Navigation Handbook,"
W.S. Kals also recommends 10 degrees of offset.
- In "Orienteering--Skills and Strategies,"
Ron Lowry and Ken Sidney suggest using an offset of between
6 and 11 degrees.
- In the second edition of "Teaching
Orienteering," Carol McNeill, Jean Cory-Wright, and
Tom Renfrew appear to advocate aiming off between 3 and
7 degrees.
- In the revised edition of "Orienteering,"
John Disley recommends an offset of 7 degrees or so.
- In the second edition of "Maps
and Compasses," Percy Blandford suggests an offset
of 10 degrees.
Keep in mind that if you don't use enough
lateral offset, you may unknowingly find yourself on the wrong
side of your objective due to unintentional lateral drift,
which may result from a number of factors including inaccurate
compass sighting and the inability to walk a precise azimuth.
In other words, if you aim off by adding
two degrees to your azimuth, but happen to experience a lateral
drift of minus three degrees, you'll unknowingly end up on
the opposite of your objective. Thinking you're on the intended
side of your objective, your search may be futile.
In general, the longer the distance, the
more difficult the terrain, or the less precise your azimuth
cutting, the greater the amount of lateral offset you'll need.
Sea kayakers and wilderness canoeists will
usually want to aim upwind or up-current so they can paddle
with the current or wind to their objective once the linear
feature is reached.
Snowshoers and cross-country skiers will
likely want to aim for the uphill side of their objective
so they can simply travel downhill to it and avoid an uphill
struggle.
Everything else being equal, opt for the
shortest route.
If you're not running a precise,
point-to-point azimuth offset, always veer around obstructions
and obstacles on the same side as you are intending to arrive
at your objective on. In other words, if you're aiming to
hit a linear feature to the left of your objective, always
go around the left side of any obstruction blocking your path
so you don't accidentally "undo" the few degrees
of offset you've built into your azimuth and unknowingly end
up on the wrong side of it.
by the Canadian Geological Survey
http://gsc.nrcan.gc.ca/geomag/field/mdcalc_e.php
by NOAA
http://www.ngdc.noaa.gov/seg/geomag/jsp/Declination.jsp
https://members.tripod.com/~BFarns/index-compass.html
http://www.learn-orienteering.org/old/
http://www.nwcg.gov/pms/training/map_comp.pdf
A U.S. Government self-study course for
wildland firefighters
Map Reading and Land Navigation (Army
FM 3-25.26)
http://www.globalsecurity.org/military/library/policy/army/fm/3-25-26/
Complete online version of Army manual.
http://education.qld.gov.au/tal/kla/compass
Topographic Symbols (Army FM 21-31)
http://www.adtdl.army.mil/cgi-bin/atdl.dll/fm/21-31/toc.htm
Complete online version of Army manual
http://www.usgs.gov
Select "fact sheets," "mapping,"
and "fact sheets."
http://www.orienteering.org/
http://www.orienteering.ca/
http://www.orientering.se/t2.asp?p=29835
http://www.orientering.se
U.S. Orienteering Federation
http://www.us.orienteering.org/
http://www.fi.uib.no/~jankoc/worldofo/
Advanced Coastal Navigation AN-1,
2nd edition (U.S. Coast Guard Auxiliary)
Basic Coastal Navigation--An Introduction
to Piloting, by F. J. Larkin (Sheridan House, 1993)
Basic Essentials of Map and Compass,
2nd edition, by Cliff Jacobson (ICS Books, Inc., 1997)
Basic Field Manual--Advanced Map
and Aerial Photograph Reading (U.S. Government Printing
Office, 1941)
Basic Map Reading Skills,
by Peter W. Preksto (Creative Education, 1979)
Basic Map Reading, by Keith
Gillard (Longman [England], 1990)
Be Expert with Map and Compass--The
Complete Orienteering Handbook, by Bjorn Kjellstrom
(MacMillan General Reference, 1994)
Better Ways of Pathfinding,
by Robert S. Owendoff (Stackpole Books, 1964)
Celestial Navigation, by
Tom Cunliffe (Fernhurst Books, 2001)
Celestial Navigation in a Nutshell,
by Hewitt Schlereth (Sheridan House, Inc., 2000)
Celestial Navigation Quick and Easy--In
Your Head Calculations of Latitude and Longitude,
by Roy T. Maloney (Dropzone Press, 2000)
Compass and Map Navigator--The Complete
Guide to Staying Found, by Michael Hodgson (Globe
Pequot Press, 2000)
Compass and Maps (Girl Scouts
of the United States of America, 1973)
Concise Book of Map Reading,
by Terry Brown and Rob Hunter (Gaga Publishing, 1980)
Contour, by Cecil McCallum
and Andrew Baxter (Holmes-McDougall)
Contours, by C. Boxhall and
E. G. P. Devereaux (Philip, 1965)
Cross-country Navigation,
by Rod Phillips and Neil Phillips (Outdoor Recreation in Australia,
1989)
Elementary Map Reading (War
Office [London], 1943)
Elements of Navigation--Prepared
Especially for Home Study (International Correspondence
Schools, 1941)
Essential Wilderness Navigator--How
to Find Your Way in the Great Outdoors, by David Seidman
(Ragged Mountain Press, 1995)
Essentials of Map Interpretation--A
Workbook, Palmyra M. Leahy and Robert E. Cramer, second
edition (Kendall/Hunt, 1991)
Exercises in Map Reading and Map
Analysis, by John E. Mulhauser (University of Akron)
Exploring and Finding the Way,
by David Watkins and Meike Dalal (Usborne [London], 1979)
Finding Your Way in the Outdoors--Compass
Navigation, Map Reading, Route Finding, Weather Forecasting,
by Robert L. Mooers (Sedgewood Press, 1990)
Finding Your Way on Land or Sea--Reading
Nature's Maps, by Harold Gatty (S. Greene Press, 1983)
Finding Your Way--The Art of Natural
Navigation, by Jennifer Dewey and Stephen Trimble
(Millbrook Press, 2001)
Finding Your Way With Map and Compass
(U.S. Geological Survey, 2000)
Finding Your Way Without Map or Compass,
by Harold Gatty (Dover Publications, Inc., 1999)
Green Beret's Compass Course--The
New Way to Stay Found (Not Lost) Anywhere, by SSG.
Don Paul (Pathfinder Publications, 1985)
Have Map, Have Compass, Will Travel--A
Walker's Guide to the Use of Map and Compass, by Kenneth
R. Walpole (K. Walpole, 1999)
How to Navigate Over Land,
Noel J. Hotchkiss (Stocker and Yale, 1991)
How to Read a Map--Using and Understanding
Maps, by Scott E. Morris (Chelsea House Publishers,
1993)
How to Teach Map and Compass Skills,
by Robert P. Larkin (National Science Teachers Association,
1976)
How to Teach with Topographic Maps,
by Dana Van Burgh, Elizabeth N. Lyons, and Marcy Boyington
(National Science Association, 1988)
How to Use a Compass, by
Kjetil Kjernsmos
Introduction to Topographic Map Reading,
by Kenneth C. Thompson (Southwest Missouri State University
Department of Geography, Geology, and Planning, 1992)
Fundamentals of Kayak Navigation,
by David Burch (The Globe Pequot Press, 1999)
**Land Navigation Handbook--The Sierra
Club Guide to Map and Compass, by W.S. Kals (Sierra
Club Books, 1983)
Land Navigation, by Bob Newman
and Susan Newman (Menasha Ridge Press)
Land Navigation for Outdoor Enthusiasts,
by Bob Newman (Menasha Ridge Press, Inc., 1995)
Land Navigation--Routefinding With
Map and Compass, by Wally Keay and Nicholas Gair (Duke
of Edinburghsaward [London], 1989)
Manual of Map Reading (Ministry
of Defence [Great Britian], 1973)
Manual of Map Reading and Land Navigation,
second edition (Ministry of Defence [Great Britain], 1988)
Map and Compass, by Cliff
Jacobson (Globe Pequot, 2000)
Map and Compass--A Practical Modern
Guide to Map Reading and the Day and Night Use of Modern Compasses,
by John B. L. Noel (Simpkin Marshall, Ltd. [London], 1942)
Map and Compass--Discover the Excitement,
by Erkka Laininen (Sunnto Oy [Finland], 1996)
Map and Compass Fundamentals--Orienteering,
by Toy Martin and Dave Lotty (Reed, 1976)
Map and Compass--Instructor Manual,
by Gail S. Ludwig (Missouri Department of Conservation, 1983)
Map and Compass Manual, by
Jackson L. Carter (Carter's Manual Company, 1954)
Map and Compass Skills for the Secondary
School, by Robert P. Larkin (National Council for
Geographic Education, 1976)
Map and Compass Study--Conservation
and Environmental Skills, by Frank G. Patterson, V.
Eugene Vivian, and Norma T. Vivian (Conservation and Environmental
Studies Center, 1969)
Map and Compass--The Principles of
Orientation, by Charles Thoene (Edward Stanford, Ltd.
[London], 1955)
Map Catalog--Every Kind of Map and
Chart on Earth and Even Some Above It, 3rd edition,
edited by Joel Makower (Vintage Books, 1992)
Map, Compass, and Campfire--A Handbook
for the Outdoorsman, by Donald E. Ratliff (Binfords
and Mort, 1992)
Map, Compass, GPS--An Introduction,
by Robert Rutten (Outdoor Communications, 2000)
Map Essentials--A Comprehensive Map
Skills Program (National Geographic School Publishing,
2001)
Map Reading (EP Publishing,
1983)
Map Reading (National Learning
Corporation, 1998)
Map Reading (Tac Ops)--A
Self-teaching Device, by Donald E. Meyer (1950)
Map Reading, by Jack Rudman
(National Learning Corporation)
Map Reading, by L. M. Sebert
and Sandi Lamanna (Renouf Pub. [Ontario], 1984)
Map Reading, by Robert B
Matkin (Dalesman, 1997)
Map Reading, by the Australian
Fire Authorities Council (Addison Wesley Longman, 1996)
Map Reading FM 21-26, by
the Department of the Army (U.S. Government Printing Office,
1969, 1983). Excellent.
Map Reading and Aerial Photographs,
by Brian O Cinneide and William MacNamara (Educational Company
[Dublin], 1986)
Map Reading and Land Navigation (Army
FM 3-25.26)
http://www.globalsecurity.org/military/library/policy/army/fm/3-25-26/
Map Reading and Land Navigation,
by U.S. Army Infantry School (Desert Publications, 1995)
Map Reading and Land Navigation,
by William (Gordon Press Publishers, 1990)
Map Reading and the Troop Leading
Procedure (MS 102), by USMA Staff (Kendall/Hunt Publishing
Co., 1993)
Map Reading Handbook, 2nd
edition (TASMAP, Tasmania Department of Environment, 1991)
Map Reading Skills, by Peter
W. Preksto (Creative Company, 1979)
Map Reading Training Course,
by Steve Depenbrok (Peace Corps)
Map Skills, by Brian Turk
(UTP [Great Britian], 1983)
Map Skills, by Pam Robson
(1998)
Map Skills, by Seymour Reit
(Macmillan Educational Company, 1984)
Map Skills, four volumes
(Phoenix Learning Resources, 1989)
Map Use--Reading, Analysis, and Interpretation,
4th edition, by Phillip C. Muehrcke and Juliana O. Muehrcke
(JP Publications, 1998). Weighing nearly 3 pounds, this 650-page
bible is chock-full of detailed map and nav info.
Maps and Compasses, 2nd edition,
by Percy W. Blanford (Tab Books, 1992)
Military Map Reading for the New
Army, by W. Stanley Lewis and F.W. Morgan (Whitconbe
& Tombs, 1945)
Military Science, MS 102, Student
Text--Map Reading and the Troop Leading Procedures
(West Point Military Academy, 1991)
Nature is Your Guide--How to Find
Your Way on Land and Sea, by Harold Gatty (Collins,
1977)
Navigation--Finding Your Way on Land
and Sea, by Tony Gibbs (Franklin Watts, 1975)
Navigation: Land, Sea, Air and Space,
by Myron Kayton, editor (Institute of Electrical & Electronics,
1990)
Never Get Lost--The Green Beret's
Compass Course, by Don Paul (Path Finder Publications,
1991)
New Explorer's Guide to Maps and
Compass, by Percy W. Blandford (McGraw-Hill Companies,1992)
Notes on Maps and Map Reading,
by H. M. E. Brunker, second edition (W. Clowes, 1905)
"On Track" Map Reading
and Camping Guide--An Educational Resource (Australian
Navigation Skills and Accessory Services, 1994)
Ordnance Survey Map Skills Book,
by Chris Warn (Nelson and Ordnance [London], 1991)
Outward Bound Map and Compass Handbook,
by Glenn Randall (Lyons and Burford, 1998)
Pathfinder's Handbook, by
Christine Kennedy, Mark Smith, Pat Hancock, and William Kimber
(Somerville House Publishing, 1993)
Piloting Seamanship and Small Boat
Handling, by Charles F. Chapman (Motor Boating)
Plan Your Route--The New Approach
to Map Reading, by Victor Selwyn (David & Charles,
1987)
Primer of Navigation, fourth
edition, by George W. Mixter (D. Van Nostrand Co., Inc., 1960).
Covers older, traditional at-sea navigation techniques.
Reading the Outdoors at Night,
by Vinson Brown (Stackpole, 1982)
Route Finding--Navigating with Map
and Compass, by Gregory Crouch (Falcon Press, 1999)
Sextant Handbook, by Bruce
A. Bauer (McGraw-Hill Professional, 1995)
Sierra Club Wayfinding Book,
by Vicki McVey and Martha Weston (Sierra Club Books, 1989)
Simple Map Reading, by Roger
Smith (The Stationary Office [Edinburgh], 1997)
Simply Map-Reading, by Richard
Neve (Telegraph [London], 1988)
Sniper Training and Employment TC
23-14, by the Department of the Army (U.S. Government
Printing Office, 1969). Good nav info.
Spur Book of Map and Compass,
by Terry Brown and Rob Hunter (Spur Books [Great Britain],
1977)
Staying Found--The Complete Map and
Compass Handbook, 2nd edition, by June Fleming (The
Mountaineers, 2001)
Step in the Right Direction--A Basic
Map and Compass Book, by Don Geary (Stackpole, 1980)
Topographic Map and Compass Use,
by Michael Taylor (Cornell University Instructional Materials
Services, 1991)
Topographic Symbols (Army FM 21-31)
http://www.adtdl.army.mil/cgi-bin/atdl.dll/fm/21-31/toc.htm
U.S. Army Map Reading and Land Navigation
Handbook, by the Department of the Army (The Lyons
Press, 2004)
Using a Compass and Pacing,
by Robert Bardon (Raleigh, North Carolina Cooperative Extension
Service, 2000)
Using a Map and Compass,
by Don Geary (Stackpole Books, 1995)
Wilderness Navigation--Finding Your
Way Using Map, Compass, Altimeter, and GPS, by Bob
Burns, Mike Burns, and Paul Hughes (Mountaineers Books, 1999)
Wilderness Route Finder--The Classic
Guide to Finding Your Way in the Wild, by Calvin Rutstrum
(University of Minnesota, 2000)
Wilderness Route Finder--The Complete
Guide to Finding Your Way in the Wilderness, by Calvin
Rutstrum (Collier Books, 1967)
You Can Be an Expert With Compass
and Map--The Orienteering Handbook, by Erik T. Hjalmar
and Rigney J. Francis (American Orienteering Service, 1977)
You'll Never Get Lost Again--Simple
Navigation for Everyone, by Robert R. Singleton (Winchester
Press, 1979)
Your Way With Map and Compass--Orienteering
Armchair Orienteering--A Practical
Guide to Reading Orienteering Maps, by Stott Wnifred
(Manitoba Orienteering Association, 1992)
AskERIC Lesson Plans--Orienteering:
Map Skills
Basic Orienteering, Michael
J. Riley and Robert Cremer (Contemporary Books, 1979)
Be Expert with Map and Compass--The
Complete Orienteering Handbook, by Bjorn Kjellstrom
(MacMillan General Reference, 1994)
Camping and Orienteering,
by Michael Jay (Warwick Press, 1990)
Challenge of Orienteering,
by Gordon Pirie (Pelham [London], 1968)
Circular Orienteering, by
Gerald Vinestock (G. Vinestock, 1980)
Complete Guide to Orienteering in
North America--A Comprehensive Manual for the Outdoorsman,
by Berndt Bergland (Pagurian Press, 1979)
Complete Orienteering Manual,
by Peter Palmer (Crowood Press, 1997)
D. Q.--A Basic Manual for Beginning
Orienteers, by Jack Dyess (J & N Enterprises,
1975)
Discovering Orienteering,
by Tony Walker (Shire, 1973)
Discovering Orienteering and Wayfaring,
by Tony Walker (Shire, 1979)
Family Orienteering--Fun and Fitness
With Map and Compass (Orienteering Federation of Australia,
1980)
Female Fitness on Foot--Walking,
Jogging, Running, Orienteering, by Bob O'Conner, Christine
Wells, and Eldin Onsgard (Wish Publishing, 2002)
Get Fit for Orienteering,
by Steve Bird (Nonington Press [England], 1996)
How to Use a Compass--Using an Orienteering
Compass for Fun & Exploration (SCIGO, 1992)
Learn Orienteering (Rebard
O-Kartservice [Norway], 1988)
Let's Get Into Orienteering,
by Toy. Martin and Robin Winterford (Aussie Sports Books,
1991)
Map and Compass Fundamentals--Orienteering,
by Toy Martin and Dave Lotty (Reed, 1976)
Modern Orienteering Training,
by Wilfred Holloway (Holl-O-Lit Publishers, 1980)
Orienteering (A. & C.
Black [London], 1995)
Orienteering (Boy Scouts
of America, 1995)
Orienteering (Nova Scotia
Department of Education, 1978)
Orienteering (P.D. Hasselberg
[New Zealand], 1980)
Orienteering, by Brian Martin
Henley (E. P. Publishing & Scottish Orienteering Federation,
1978)
Orienteering, by Brian Porteous
(Oxford Illustrated Press, 1978)
Orienteering, by Carol McNeill
(Crowood Press, LTD, 1996)
Orienteering, by D. J. Foster
and R. R. McGraw (Curriculum and Research Branch, Education
Department [Melbourne], 1974)
Orienteering, by J. D. Watson,
Laurence Ernest Liddell, and Hugh Chapman (E. P. Publishing
& Scottish Orienteering Association, 1973)
Orienteering, by John Disley
(Stackpole Books, 1979)
Orienteering, by Hans Bengtsson
(Ward Lock [London], 1978)
Orienteering, by Neil Champion
(Heinemann Library, 2000)
Orienteering, by Roger Smith
(State Mutual, 1981)
Orienteering, by Tom Renfrew
(Human Kinetics Publishers, Inc., 1997)
Orienteering--A Mental Training Workbook,
by Gordon L. Underwood and Stephen R. Bird (Nonington Press,
1997)
Orienteering Book, by Steve
Anderson (Anderson World, 1977)
Orienteering for Fitness and Pleasure,
by Norman Harris (World's Work, 1978)
Orienteering for Sport and Pleasure,
by George Atkinson and Hans Bengtsson (Green, 1977)
Orienteering for Sport and Pleasure,
by Hans Bengtsson and George Atkinson (The Stephen Green Press,
1977)
Orienteering for the Young
(International Orienteering Foundation)
Orienteering--Fun and Fitness With
Map and Compass, by Peter C. Nicholls (New South Wales
Sport and Recreation Service, 1975)
Orienteering Handbook, by
Anne Anthony (Hancock House, 1980)
Orienteering Handbook--Mankato State
University Army ROTC, by Edward C. Otto
Orienteering Instructor's Manual,
by James Gilchrist and Lee Jack (Orienteering Ontario, 1984)
Orienteering--Instructor's Manual,
by Peter C. Nicholls (Martin Educational in Association with
Orienteering Service of Australia, 1977)
Orienteering--Instructor's Resource
Manual, by Wilf Wedmann, Jennifer Fenton, and Bryna
Kopelow (BC Recreation and Sport, Premier's Sports Awards
Program, 1990)
Orienteering--Skills and Strategies,
by Ron Lowry and Ken Sidney (Orienteering Ontario, 1987)
Orienteering--The Adventure Game,
by Ron Lowry (Orienteering Ontario, 1987)
Orienteering the Easy Way--A Practical
Guide to Learning, Teaching, and Practicing Orienteering Skills,
by Brian Kendrick (B. Kendrick, 2000)
Orienteering--The Skills of the Game,
by Carol McNeill (Crowood Press [England], 1996)
Orienteering--The Sport of Navigating
With Map and Compass, by Steven Boga (Stackpole Books,
1997)
Orienteering Training and Coaching,
by Carol McNeil, et al. (British Orienteering Federation,
1982)
Orienteering--Training for Performance,
by Ron Lowry and Ken Sidney (Orienteering Ontario, 1986)
Outward Bound Orienteering Handbook,
by Martin Bagness (Ward Lock [London], 1995)
Penguin Book of Orienteering,
by Roger Smith (Penguin, 1983)
Rogaining, Cross-country Navigation,
by Neil Phillips and Rod Phillips (Outdoor Recreation in Australia,
1982)
Rules of Foot Orienteering
(Irish Orienteering Association, 2000)
Skills of the Game, by Carol
McNeill (Corwood Press, 1996)
Start Orienteering (5-book
series), by Carol McNeill and Tom Renfrew (Harveys, 1990)
Tackle Orienteering, by John
Disley (Stanley Paul [London], 1982)
Teaching Orienteering (Johnson
Camping, Inc., 1991)
Teaching Orienteering, second
edition, by Carol McNeill, Jean Cory-Wright, and Tom Renfrew
(Human Kinetics Publishers, Inc., 1998). An excellent, inside
look at the skill of orienteering.
This is Orienteering, by
Jim Rand and Tony Walker (Pelham & British Orienteering
Federation [London], 1976)
Trail Orienteering, by Anne
Braggins (Harveys, 1993)
Venture Orienteering (Boy
Scouts of America, 1989)
Wilderness Navigation Handbook,
by Fred Touche (Touche Publishing, 2004)
World Class Orienteering,
by Wilfred Holloway (Holl-O-Lit Publishers, 1980)
World of Orienteering (International
Orienteering Federation [Finland], 1998)
Your Way With Map and Compass--Orienteering
1-785-594-3516
http://www.aeorienteering.com/
Adventure GPS
1-888-477-4386
http://www.gps4fun.com
Ben Meadows Company
1-800-241-6401
http://www.benmeadows.com
1-770-682-9885
http://www.thecompassstore.com/
866gaiters.com
1-888-424-8377
http://866gaiters.com/
Forestry Supplies, Inc.
1-800-647-5368
http://www.forestry-suppliers.com
1-866-424-8377
http://www.866gaiters.com
http://www.moscompass.ru/
http://www.moscompass.ru/eng/index-eng.htm
Russian-made compasses
http://www.orienteeringunlimited.com
1-877-850-2420
http://www.orienteer.com/
Silverman's Ltd. (10-06)
2 Harford St.
Mile End
London E1 4PS
1-0171-790-5257
http://www.silvermans.co.uk
Unique British land nav gear
Waypoint Enterprises
1-888-412-2600
http://www.waypoint-ent.com
Additional sources for land navigational
tools can also be found in the "general" and "military"
sections of the backpacking resources
page of this Web site.
Brunton Company
1-800-443-4871
http://www.brunton.com/
Note: In addition to distributing Brunton
compasses, Brunton, as a subsidiary of Silva Production AB
(Silva Sweden AB) since 1996, also distributes Silva compasses
in the U.S. under the Nexus name.
http://www.kasper-richter.de/english/compasses.html
http://www.moscompass.ru/
http://www.moscompass.ru/eng/index-eng.htm
1-800-443-4871
http://www.brunton.com/
Note: Nexus compasses are Silva compasses
distributed in the U.S. under the U.S. trade name of Nexus
by Brunton.
Pyser-SGI Limited
http://www.pyser-sgi.com/index.asp
Precision military compasses from the United
Kingdom
http://www.recta.ch
Note: Precision, Swiss-made compasses distributed
by the Suunto USA.
http://www.silva.se/
Note: In the U.S., Silva Sweden AB compasses
are distributed by Brunton under the Nexus name. In the U.S.,
Johnson Outdoors, Inc. distributes compasses under the name
of Silva.
1-262-884-1500
http://www.silvacompass.com/
Note: Johnson Outdoors, Inc., distrubutes
Silva compasses under the Silva name in the U.S.
1-800-441-0132
http://www.suncompany.net
Compasses are listed under both "compasses"
and "outdoor instruments."
1-800-543-9124
http://www.suuntousa.com
1-888-275-8747
http://www.usgs.gov/
Select "Map" link http://ask.usgs.gov/maps.html
for map ordering info.
1-303-759-5050
http://www.mapmart.com/
Stocks paper quads; restocks daily with
local USGS map office
1-775-787-7444
http://www.offroute.com
Sells unique, customized topographic maps
for your trip.
1-888-545-8111
http://www.fedmaps.com
Order free map index to determine which
maps you need.
Allow several weeks for delivery.
300 Water Street
P.O. Box 7000
Peterborough, Ontario, Canada K9J 8M5
1-800-667-1940
http://themnrstore.mnr.gov.on.ca
Click on "English" and "maps"
Order free map index
to determine which maps you need.
Most detailed maps available.
Allow several weeks for delivery.
Michigan
Recreational Travel Atlas
Universal
Map
1-800-829-6277
http://universalmap.com
This 11-by-17-inch book of maps
is a recommended county map source for wilderness trips since
its maps include section numbers as well as township and range
information. It also includes many old roads and placenames.
Simply photocopy the appropriate maps and stow them in your
pack. Keep the map book itself in your vehicle for easy reference
when searching for the trailhead.
Michigan
County Atlas
Universal
Map
1-800-829-6277
http://universalmap.com
Note: This 11-by-17-inch book
is no longer in print. It may be available used, or via your
local library.
This book of maps is highly recommended
county map source for wilderness trips since its maps include
section numbers as well as township and range information.
It also includes many old roads and placenames. Simply photocopy
the appropriate maps and stow them in your pack. Keep the
map book itself in your vehicle for easy reference when searching
for the trailhead. However, this map lacks latitudinal and
longitudinal data, which is handy when trying to decided what
topographic maps you need to buy for a bush trip.
Michigan County Map Guide
(2000)
Michigan United Conservation Clubs (MUCC)
1-800-777-6720
http://www.mucc.org
Note: This 11-by-17-inch
book is no longer in print. It may be available used, or via
your local library.
This book of
maps is a recommended county map source for wilderness trips
since its maps include section numbers as well as township
and range information. Simply photocopy the appropriate maps
and stow them in your pack. Keep the map book itself in your
vehicle for easy reference when searching for the trailhead.
However, this map lacks latitudinal and longitudinal data,
which is handy when trying to decided what topographic maps
you need to buy for a bush trip.
Michigan Atlas & Gazetteer
DeLorme Mapping Company
1-800-561-5105
http://www.delorme.com
Note: While this 11-by-17-inch
book of maps lacks critical section lines and numbers as well
as township and range information, its inclusion of latitudinal
and longitudinal data makes it very useful for deciding which
topographic maps to buy for a bush trip.
Mapbook
of Michigan Counties (1984)
Michigan Natural Resources
Magazine
Michigan Department Of Natural Resources
P.O. Box 30034
Lansing, Michigan 48909
Note: This 11-by-17-inch book is no longer in print.
It may be available used, or via your local library.
This book of
maps is highly recommended county map source for wilderness
trips since its maps include section numbers as well as township
and range information. It also includes many old roads and
placenames. Simply photocopy the appropriate maps and stow
them in your pack. Keep the map book itself in your vehicle
for easy reference when searching for the trailhead. However,
this map lacks latitudinal and longitudinal data, which is
handy when trying to decided what topographic maps you need
to buy for a bush trip.
Plat maps are extremely useful when planning
an off-trail wilderness trip since they can help you chart
private property and public property on your topographic maps
prior to your trip. Plat maps are sold in books by county.
To determine who sells the plat maps for a particular county,
try contacting the county clerk's office in the county you
will be hiking in. A handy directory of county clerks is available
online from the State Archives of Michigan:
http://www.sos.state.mi.us/history/archive/archgene.html
1-800-561-5105
1-800 452-5931
http://www.delorme.com
1-888-839-5551
http://www.maptech.com
See Terrain Navigator product
1-800-962-1643
http://www.nationalgeographic.com
Select "maps"
http://www.gisdatadepot.com
http://www.maptech.com
Select "online maps"
http://www.terraserver.microsoft.com
http://www.topozone.com
http://maps.google.com/maps
Satellite images of U.S. & Canada.
Use "local search" for detailed
views
http://www.michigan.gov/dnr
Select "publications & maps"
& "aerial imagery archive"
http://www.michigan.gov/dnr
Select "publications & maps"
& "aerial imagery archive"
300 Water Street
P.O. Box 7000
Peterborough, Ontario, Canada K9J 8M5
1-800-667-1940
http://themnrstore.mnr.gov.on.ca
Click on "English" and "air
photos"
As GPS units become commonplace among wilderness
trippers, so does the potential for trouble when one of them
malfunctions. Like any essential electronic device, it's not
a question of "if" your global positioning system
device will fail. It's only a question of "when"
it will fail, and if you'll know what to do.
If your safety depends on a GPS unit, you
should be prepared to navigate without it when it malfunctions
deep in the wilderness. Carrying your GPS unit in a padded
case and knowing how to use the device are not enough.
You must also have a working knowledge
of land navigation with map and compass. Your rucksack should
contain a GPS instruction manual, topographic map, orienteering
compass, spare batteries, writing instrument, notepad, and
UTM grid plotter.
Deep in a swamp with darkness setting in
is no place to find out you forgot how to enable your unit's
backtracking function. Since foul weather can ruin an owner's
manual in short order, photocopy and waterproof the pertinent
sections with a commercial map sealer or by simply brushing
on a thin coat of Thompson's Water Seal. Carry your manual
in a see-through, zip-lock plastic bag.
Batteries are the weakest link in GPS units,
so carry spare ones. If your unit is on for long periods,
it'll require more batteries then if it's just used occasionally.
In cold weather, alkaline batteries and
liquid crystal displays (LCDs) can fail to function, so keep
them inside your jacket where they'll remain warm and operational.
Lithium batteries are an excellent option as they're unaffected
by deep cold.
When your GPS unit goes bad, you'll need
a detailed topographic map to figure out where you are, where
you need to go, and how to get there. The best maps for this
purpose are the standard 7.5-minute, 1:24,000 United States
Geological Survey (USGS) topographic maps, which cover a 6-
by 8.5-mile area.
Experienced land navigators never enter
the wilderness without these detailed, multi-colored quads.
Carry your waterproofed maps in clear-plastic zip-lock bags.
Detailed maps are of little value without
a compass, so always carry an orienteering-style compass.
The large, see-through, plastic-based ones from Silva, Suunto,
or Brunton are the most useful and reliable.
The cumbersome process of calculating and
plotting latitudinal and longitudinal coordinates in the field
can be simplified by switching your unit's coordinate system
from lat/lon to the UTM coordinate system.
The UTM system is the hands-down favorite
of experienced land navigators; it's also very similar to
the military's MGRS coordinate system.
After switching coordinate systems, make
sure you select the appropriate horizontal map datum in your
unit's setup menu. Check the margin of your map for the correct
datum setting.
Here in Michigan, it's most likely going
to be the 1927 North American Datum, which is frequently abbreviated
as "NAD 27 CONUS." Don't forget to select the proper
UTM zone (16 or 17 in Michigan) and switch the unit's measurement
system over to metric.
With a simple commercial or homemade UTM
map plotter, you'll be able to quickly and easily move UTM
coordinates from your GPS unit to a topographic map and vice
versa.
For example, you'll be able to take a
UTM coordinate generated by your GPS unit and plot it on your
map in a matter of seconds. Likewise, you'll be able to rapidly
calculate the UTM coordinates of an interesting spot on the
map, like a waterfall, and then plug the coordinates into
your GPS unit.
Once in the field, get in the habit regularly
comparing and contrasting your map and the surrounding terrain
so you have a general idea of where you are, where you've
been, and where you're going.
Periodically, make notations in your notebook
or on the map as to the times you pass known landmarks such
as trails, intersections, creek crossings, cabins, peaks,
etc. Jot down your direction of approach and departure from
each of these locations too. It's also important to record
any critical waypoints in your notes or plot them on your
map.
By taking regular notes, knowing how to
use your GPS unit's UTM grid coordinate system, and understanding
the basics of map and compass land navigation, you'll be able
to quickly formulate an alternative plan when your GPS unit
malfunctions.
You'll be able to approximate where you
are relative to your last known position and then determine
which direction you need to proceed to return to your vehicle
or campsite.
As with any outdoor adventure, your last
line of defense is always the survival kit tucked deep in
your rucksack and an approximate itinerary left with a trusted
person.
To learn more about GPS units and how to
use the UTM grid coordinate system, read the very inexpensive
"Using GPS--GPS Simplified for Outdoor Adventures,"
by Bruce Grubbs (1999, Falcon Publishing Co., ISBN 1560448210)
and "GPS Made Easy--Using Global Positioning Systems
in the Outdoors, third edition, by Lawrence Letham (2001,
Mountaineers Books, ISBN 0898868025).
Another, more comprehensive work on the
subject is "A Comprehensive Guide to Land Navigation
with GPS," third edition, by Noel J. Hotchkiss (1999,
Alexis, ISBN 189268800X).
On the Internet visit http://www.usgs.gov
("fact sheets," "mapping," "fact
sheets," and "The Global Positioning System"),
http://www.maptools.com,
and http://www.joe.mehaffey.com.
To make your own UTM coordinate plotter,
visit http://www.maptools.com.
Information about where to buy maps,
compasses, UTM plotters, waterproof notepads, and write-in-the-rain
pens, is available elsewhere on this page.
http://www.geocaching.com/
http://www.gpsnavigatormagazine.com
Online magazine
http://www.macgpspro.com/links.html
http://www.joe.mehaffey.com
http://www.gpsinformation.net/
http://www.maptools.com
http://www.vancouver-webpages.com/peter/index.html
http://www.edu-observatory.org/gps/gps.html
Global Positioning System Overview
http://www.colorado.edu/geography/gcraft/notes/gps/gps.html
http://www.usgs.gov
Select "fact sheets," "mapping,"
"fact sheets,"
and "The Global Positioning System."
Comprehensive Guide to Land Navigation
with GPS, 3rd edition, by Noel J. Hotchkiss (Alexis,
1999)
Global Navigation--A GPS User's Guide,
by Neil Ackroyd and Robert Lorimer (LLP, Inc., 1994). Sea
navigation.
Global Positioning System--Theory
and Practice, by B. Hofmann-Weuenhof, Herbert Lichtenegger,
and James Collins (Springer-Verlag, 2001). Technical
GPS (Basic Essentials Series),
by Scottie Barnes (Globe Pequot, 2000)
GPS for Everyone: How the Global
Positioning System Can Work for You, by L. Casey Larijani
(American Interface Corporation, 1998). General overview of
GPS and it's implications for society in the future.
GPS Instant Navigation--A Practical
Guide From Basics to Advanced Techniques, by Kevin
Monahan, Don Douglass, and Reanne Hemingway-Douglass (Fine
Edge Productions, LLC, 1998). GPS for watercraft.
GPS Land Navigation--A Complete Guide
For Backcountry Users of the NAVSTAR Satellite System,
by Michael Ferguson (Glassford Publishing, 1997)
**GPS Made Easy--Using Global Positioning
Systems in the Outdoors, 2nd edition, by Lawrence
Letham (The Mountaineers, 1999)
GPS Manual: Principles and Applications,
by Steve Dye (Baylin Publications, 1997). Technical.
GPS Navigation Guide--Using GPS with
Map, Compass, Computer & Radio Tracking, by Jack
W. Peters (2002)
GPS Primer, by Jerry Hnang
(Acme Press, 1999)
Map, Compass, GPS--An Introduction,
by Robert Rutten (Outdoor Communications, 2000)
Map Use--Reading, Analysis, and Interpretation
(With GPS), 4th edition, by Phillip C. Muehrcke and
Juliana O. Muehrcke (JP Publications, 1998). Weighing nearly
3 pounds, this 650-page bible is chock-full of detailed map
and nav info.
Simple GPS Navigation: Sea, Air,
Land, by Mik Chinery (Koen Book Distributors, 1994)
Understanding GPS: Principles and
Applications, by Elliott D. Kaplan, editor (Artech
House, Inc., 1996). Very technical.
Understanding the GPS--An Introduction
to the Global Positioning System, by Gregory T. French
(High Mountain Press, 1998). Very technical.
Understanding the Navstar : GPS,
GIS, and IVHS, by Tom Logsdon (Wiley, John & Sons,
Inc., 1995). Technical.
User's Guide to GPS--The Global Positioning
System, by Bonnie Dahl, Steve Ault, Peter Dahl, and
More Rubenstein (Richardsons' Publishing, Inc., 1993). Technical.
Using GPS--Finding Your Way with
Global Positioning Systems, by Conrad Dixon (Sheridan
House, Inc., 1999). For watercraft.
**Using GPS--GPS Simplified for Outdoor
Adventures (or Finding Your Way with the Global Positioning
System), by Bruce Grubbs (Falcon Publishing, Inc.,
1999)
Wilderness Navigation--Finding Your
Way Using Map, Compass, Altimeter, and GPS, by Bob
Burns, Mike Burns, and Paul Hughes (Mountaineers Books, 1999)
1-732-346-3053
http://www.gpsworld.com
1-888-477-4386
http://www.gps4fun.com
Ben Meadows Company
1-800-241-6401
http://www.benmeadows.com
1-303-420-6413
http://www.data-nation.com/
GPS for computers and PDAs
Forestry Supplies, Inc.
1-800-647-5368
http://www.forestry-suppliers.com
1-888-882-6342
http://www.gpsblowout.com
1-866-477-2489
http://www.gpscity.com
1-888-477-2611
http://www.thegpsstore.com/
http://www.maptools.com
Waypoint Enterprises
1-888-412-2600
http://www.waypoint-ent.com
Additional sources for GPS units can be
found in the "general" and "military"
sections of the backpacking resources
page on this Web site.
For a comprehensive list of GPS Receiver
Manufacturers, System Integrators, Equipment Suppliers,
and Service Providers, visit http://gauss.gge.unb.ca/manufact.htm,
which is maintained by the Canadian Space Geodesy Forum
and the University of New Brunswick
1-800-324-1354
http://www.eaglegps.com
Marine units
1-800-800-1020
http://www.garmin.com/
1-510-490-8076
http://www.leadtek.com.tw
GPS for computers and PDAs
1-800-324-1356
http://www.lowrance.com/
1-800-707-9971
http://www.magellangps.com/
| |
|
1 |
0.91 |
3 |
0.18 |
0.05 |
4.5 |
| |
|
1.1 |
1 |
3.3 |
0.2 |
0.05 |
5 |
| |
|
5.5 |
5 |
16.5 |
1 |
0.25 |
25 |
| |
|
22 |
20.1 |
66 |
4 |
1 |
100 |
| 1/16 |
0.1 |
110 |
100 |
330 |
20 |
5 |
500 |
| 1/8 |
0.2 |
220 |
200 |
660 |
40 |
10 |
1000 |
| 1/4 |
0.4 |
440 |
400 |
1320 |
80 |
20 |
2000 |
| 3/8 |
0.6 |
660 |
600 |
1980 |
120 |
30 |
3000 |
| 1/2 |
0.8 |
880 |
800 |
2640 |
160 |
40 |
4000 |
| 5/8 |
1 |
1100 |
1000 |
3300 |
200 |
50 |
5000 |
| 3/4 |
1.2 |
1320 |
1200 |
3960 |
240 |
60 |
6000 |
| 7/8 |
1.4 |
1540 |
1400 |
4620 |
280 |
70 |
7000 |
| 1 |
1.6 |
1760 |
1600 |
5280 |
320 |
80 |
8000 |
| 1.25 |
2 |
2200 |
2000 |
6600 |
400 |
100 |
10000 |
| 1.5 |
2.4 |
2640 |
2400 |
7920 |
480 |
120 |
12000 |
| 1.75 |
2.8 |
3080 |
2800 |
9240 |
560 |
140 |
14000 |
| 2 |
3.2 |
3520 |
3200 |
10560 |
640 |
160 |
16000 |
| 1 |
|
|
|
70 x 70 |
| 40 |
1/4 x 1/4 |
1/16 |
|
440 x 440 |
| 160 |
1/2 x 1/2 |
1/4 |
|
880 x 880 |
| 640 |
1 x 1 |
1 |
1/36 |
1760 x 1760 |
| 23040 |
6 x 6 |
36 |
1 |
|
| 1 |
1/360 |
17.8 |
1.1 |
| 3' (0.056) |
1/6400 |
1 |
1/36 |
| 54' (0.9) |
1/400 |
16 |
1 |
http://www.cmpsolv.com/los/sunset.html
U.S. Naval Observatory
http://aa.usno.navy.mil/data/
|